
Holiday Tea Cocktails
The holidays have arrived and whether you are celebrating with a group, or just a couple of friends, it's time to break out that cocktail shaker! Adding tea to your cocktails will give them a unique and memorable twist. Since we're all tea fanatics here, I have created two tea cocktails and one mocktail (an unspirited cocktail) incorporating festive holiday flavors that will work for any type of gathering.
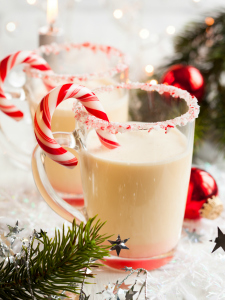
Candy canes are a requirement for this time of year, so why not use their sweet minty flavor in a cocktail? I also like to add a hint of chocolate to minty drinks. The combination is rich and refreshing. And really, who doesn't love a little bit of chocolate?
Chocolate Candy Cane Tea Cocktail
Makes 2 drinks
3/4 cup water
2 Adagio Candy Cane teabags (or 2tsp loose tea)
3 tablespoons chocolate liqueur
1/4 cup whole milk (soy or almond can also be used)
Mini candy canes for garnish
Whipped cream for garnish (optional)
Bring the water to a boil in a small pot. Turn off heat and add teabags. Allow to steep for 5-8 minutes. Cool fully. You can make this ahead and refrigerate until you need to use it.
In a cocktail shaker add the tea, chocolate liqueur and milk, and shake it up to combine. Pour into 2 glasses and garnish with mini candy canes and whipped cream. Easy and delicious!
The next cocktail uses cranberry, a flavor that appears on most holiday tables from Thanksgiving to New Years. The flavor compliments just about everything you'll be serving this season. I always enjoy playing with sweet and tart, and this cocktail hits the right balance. It also has a bit of bubbly, another holiday requirement! This drink works best in champagne flutes or coupes, but use whatever festive glasses you have on hand.
Cranberry Holiday Cocktail
Makes 3-4 drinks
1 cup water
2 Adagio Cranberry tea bags (or 2tsp loose tea)
2 tablespoons sugar (more to taste)
1 cup Sparkling wine
Halved fresh cranberries for garnish
Bring water to a boil in a small pot. Turn off heat and add teabags. Allow to steep for 5-8 minutes. While the tea is still warm, stir in the sugar. Add more to taste if you prefer it sweeter.
Pour sparkling wine in half of each glass and top with the cooled tea and garnish with cranberries. Toast to a bright holiday season!
For something festive, without the alcohol, how about a gingerbread mocktail? This drink will please revelers of all ages. It's sweet with a slight gingery kick, bringing holiday flavors straight to your glass. It's delicious as-is, but if you would like to add a bit of alcohol I'd recommend vanilla-flavored vodka.
Holiday Gingerbread Mocktail
Makes 2 drinks
2 tablespoons brown sugar
2 tablespoons simple syrup (recipe below)
4 Adagio Gingerbread teabags (or 4tsp loose tea)
½ teaspoon vanilla
3 tablespoons half and half
2 cups water
For the simple syrup: bring 1 cup of water to a boil in a small saucepan. Lower the heat and add 1 cup of sugar. Stir until dissolved and turn off the heat. Allow to cool fully. I like to keep a bottle of simple syrup in the fridge; it is perfect for sweetening cocktails or iced drinks.
For the cocktail: In a small saucepan boil the 2 cups of water and turn off heat. Add in the 4 teabags and steep for 5-8 minutes. Remove teabags and stir in the brown sugar. Add more to taste. Allow to fully cool. Add tea to a cocktail shaker along with the vanilla, simple syrup, and half and half. Give it a good shake, and serve in fancy glasses. If you have a few gingerbread cookies on hand to go with the cocktail, even better!
Whatever your plans this holiday season, don't forget to add tea to the celebration. I hope you all enjoy! Happy Holidays!